Level 5 - Caves
Entrance
Move forward and pick up the Crystal Shard on the ground, then walk down the slope into the Cavern.
Cavern
Behind us is a hulking enemy, but we're going to ignore him for now. Just move forward until you enter a tunnel.
Upper Tunnels
Before you is a downward slope. Don't move down there yet. Instead, turn to the right to spot a side tunnel. Move down this path until you spot a low-hanging stalactite on the left illuminated by some purple light emanating from a hole in the ground. Make your way over to this and a spot near the tip should become highlighted. Inspection will reveal that there's a hole there. Stick the Metal Bar into it (may take some maneuvering to find the sweet spot for the Use icon to appear), then hang the Lantern on it. Cast Sunbeam on the Lantern to send a beam of light shining into the hole. Continue along this path.
Mirror Cavern
There's a mirror mounted to a central pillar in this cavern with a wheel crank beside it. To the right is a tunnel blocked by Sunburst-proof darkness, which we shall ignore for now. Move forward to the tunnel entrance on the other side of the cavern.
Upper Tunnels
To the left is the slope we ignored earlier, and we shall continue that tradition for now. Ahead of us the tunnel narrows and moves down some stairs, and that is the branch we need to take. At the bottom we'll find an entrance into the Grotto.
Grotto
At the over end of the room, we can see the beam of light we created ealier shining down on a short stone pedestal. Head over there and place the Crystal Shard on it, then head back up to the Mirror Cavern.
Mirror Cavern
We return to find that the beam of light has now bounced off of a series of crystals and is not shining onto the mirror. Turn the wheel crank to the right twice to rotate the mirror and deflect the light toward the tunnel with the impassible darkness. This will dispel the miasma and allow you passage into that tunnel. Walk down the steps into the Lower Tunnels A.
Lower Tunnels A
Continue forward until you encounter a group of Depth Spiders!
General Strategy: By far my least favorite fight in the game, just because it takes so long while being tedious. I have not found a way to make this go faster. The basic premise is that if you attack a spider that is not poised to attack, it will trigger them to do an instant kill attack. There's not really a way to attack a small group...you'd think that Lightning Strike would only hit spiders directly on either side of the target, but it does not operate that way (and who knows if that's intentional or not) and will just target a spider toward the front of the pack.
How to Defeat:
- Round 1: The spiders attack. Cast Fireball on one of the spiders that are rearing up for an attack, which is strong enough by now to one shot the spider.
- Round 2: The spiders attack. Cast Ice Shards on one of the spiders that are rearing up for an attack. This will only drain half of the spider's HP.
- Round 3 and onward: Repeat the process until all spiders are dead. You can toss in a Sunburst or a Stone Shield if you're worried about your health, but you should be fine. Just avoid any multi target spells.
After your hard-won victory, move forward until you reach a locked door. There's a crescent moon shaped indentation in the lock, but we can't do anything with that yet. There is, however, a Helmet on the floor right in front of the door that you should pick up.. Metal hat in hand, return to the Cavern (we finally get to use that slope!)
Cavern
Straight ahead is the path back to the entrance. We're not heading that way, however. Just to the right is another room we can get to, but it's being blocked by the Crystal Golem!
General Strategy: He's super weak to lightning, but is also adept at lowering your accuracy so you'll have to find a way to circumvent that.
How to Defeat:
- Round 1: For some reason, you get to launch the opening salvo in this fight. So start things off by casting Malice.
- Round 2: Most likely he will use a light attack that mimics blinding light but lasts for multiple rounds. Since Malice was used, the dark aura will negate the light spell, or something. Note that there's a slim chance he'll just do a regular attack and blind you next round. At any rate, gear up with Fury of the Storm.
- Round 3: Most likely he'll do a regular attack. Respond by casting Lightning Strike twice to end the fight.
After defeating the Golem, move into the room he was guarding.
Armor Room
 You'll enter a cavern with several suits of armor. Three of them guard a wall of ice. Those three have some sort of possessed demonic ice growing out of them, and said demon ice prevents the wall of ice from being melted. Luckily for us, those little guys are just looking for a new home. Like hermit crabs do. If they see something close by that could also be a fun home, they'll instantaneously teleport to it, as is absolutely the case with the noble hermit crab. Don't bother checking the science behind that statement.
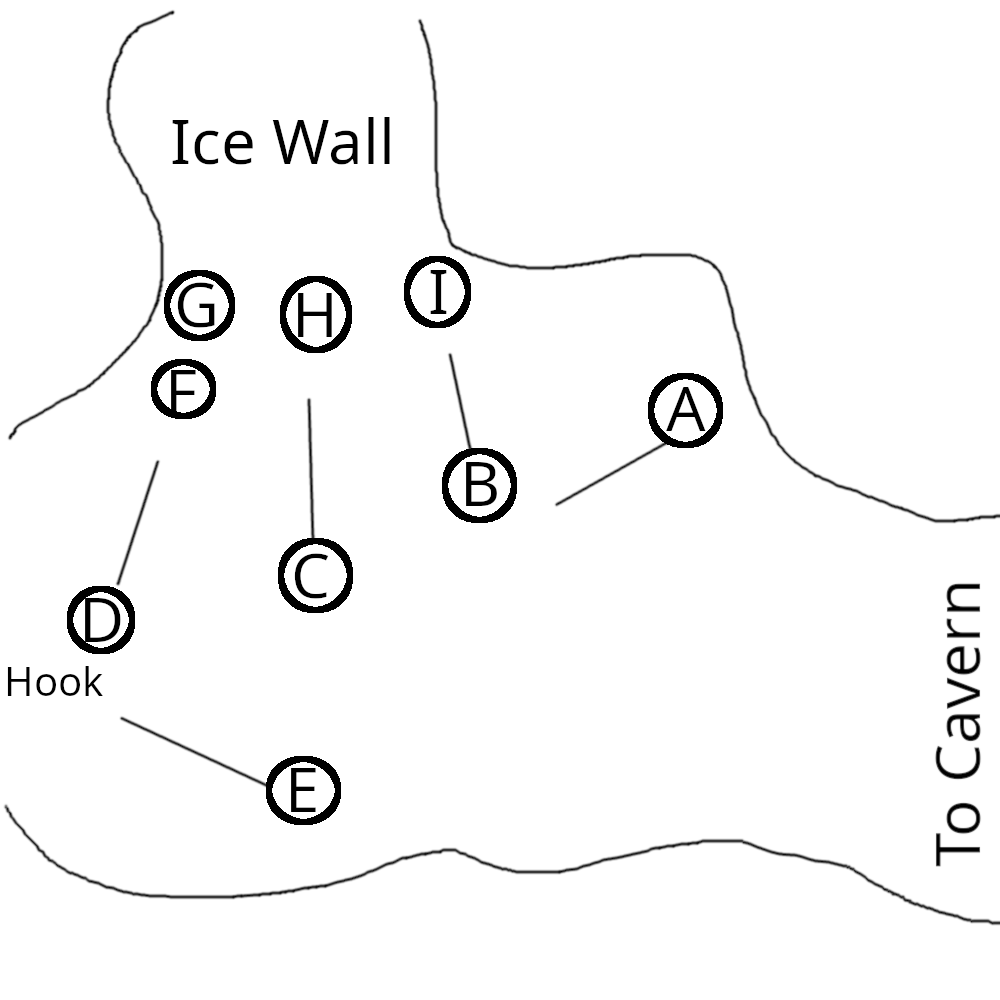
First things first, approach the far left statue just in front of the ice wall (labeled as G in the diagram). This set of armor is missing a helmet, so go ahead and use the Helmet on it to complete the armor set. Not that it looks like the other armor sets, the ice demon will be willing to move. The basic conceit here is that the armored statues are mounted onto tracks, and you can slide them back and forth along the tracks. The goal is to get the three ice demons to hop to different statues and get them as far away from the ice wall as possible. Let's start simple:
Click on Statue C to slide it next to Statue H. After the ice demon moves, click on Statue C again to slide it back to it's starting position. This is all you need for the middle ice demon.
On to the next one. Move Statue B to transfer the ice demon to it from Statue I. Click on B again to move it back, and then move Statue A to transfer from B to A. Move Statue A back to the starting point to get the ice demon out of range.
Last one is a little trickier. When we added the Helmet to Statue G, the ice demon hopped over to Statue F. Move Statue D to get the ice demon moved to it, then move it back to the starting position. If you move Statue E, you'll soon notice that it moves back on its own before the ice demon has time to transfer itself. Near the base of Statue D is a large metal hook sticking out of the ground. What you need to do is to move Statue E, then use the Chains on that metal hook before it moves back. Raven will thread the chain through the hook and around Statue E, locking it in place. Once the ice demon moves to E, pick up the Chains to release it.
All three ice demons are now far enough away from the ice wall, so go ahead and use a Fireball on it to melt it. Step through the newly opened doorway with your eyes to the ground. You should spot the Moon Pendant on the ground. Pick it up, then backtrack to the Lower Tunnels A.
Lower Tunnels A
Make your way to the end of the tunnel, where the giant locked door is. To get past this, just equip the Moon Pendant. Once you're wearing this, the door will open at your command. Go ahead and test your new powers out and enter the next room.
Mirror Chamber
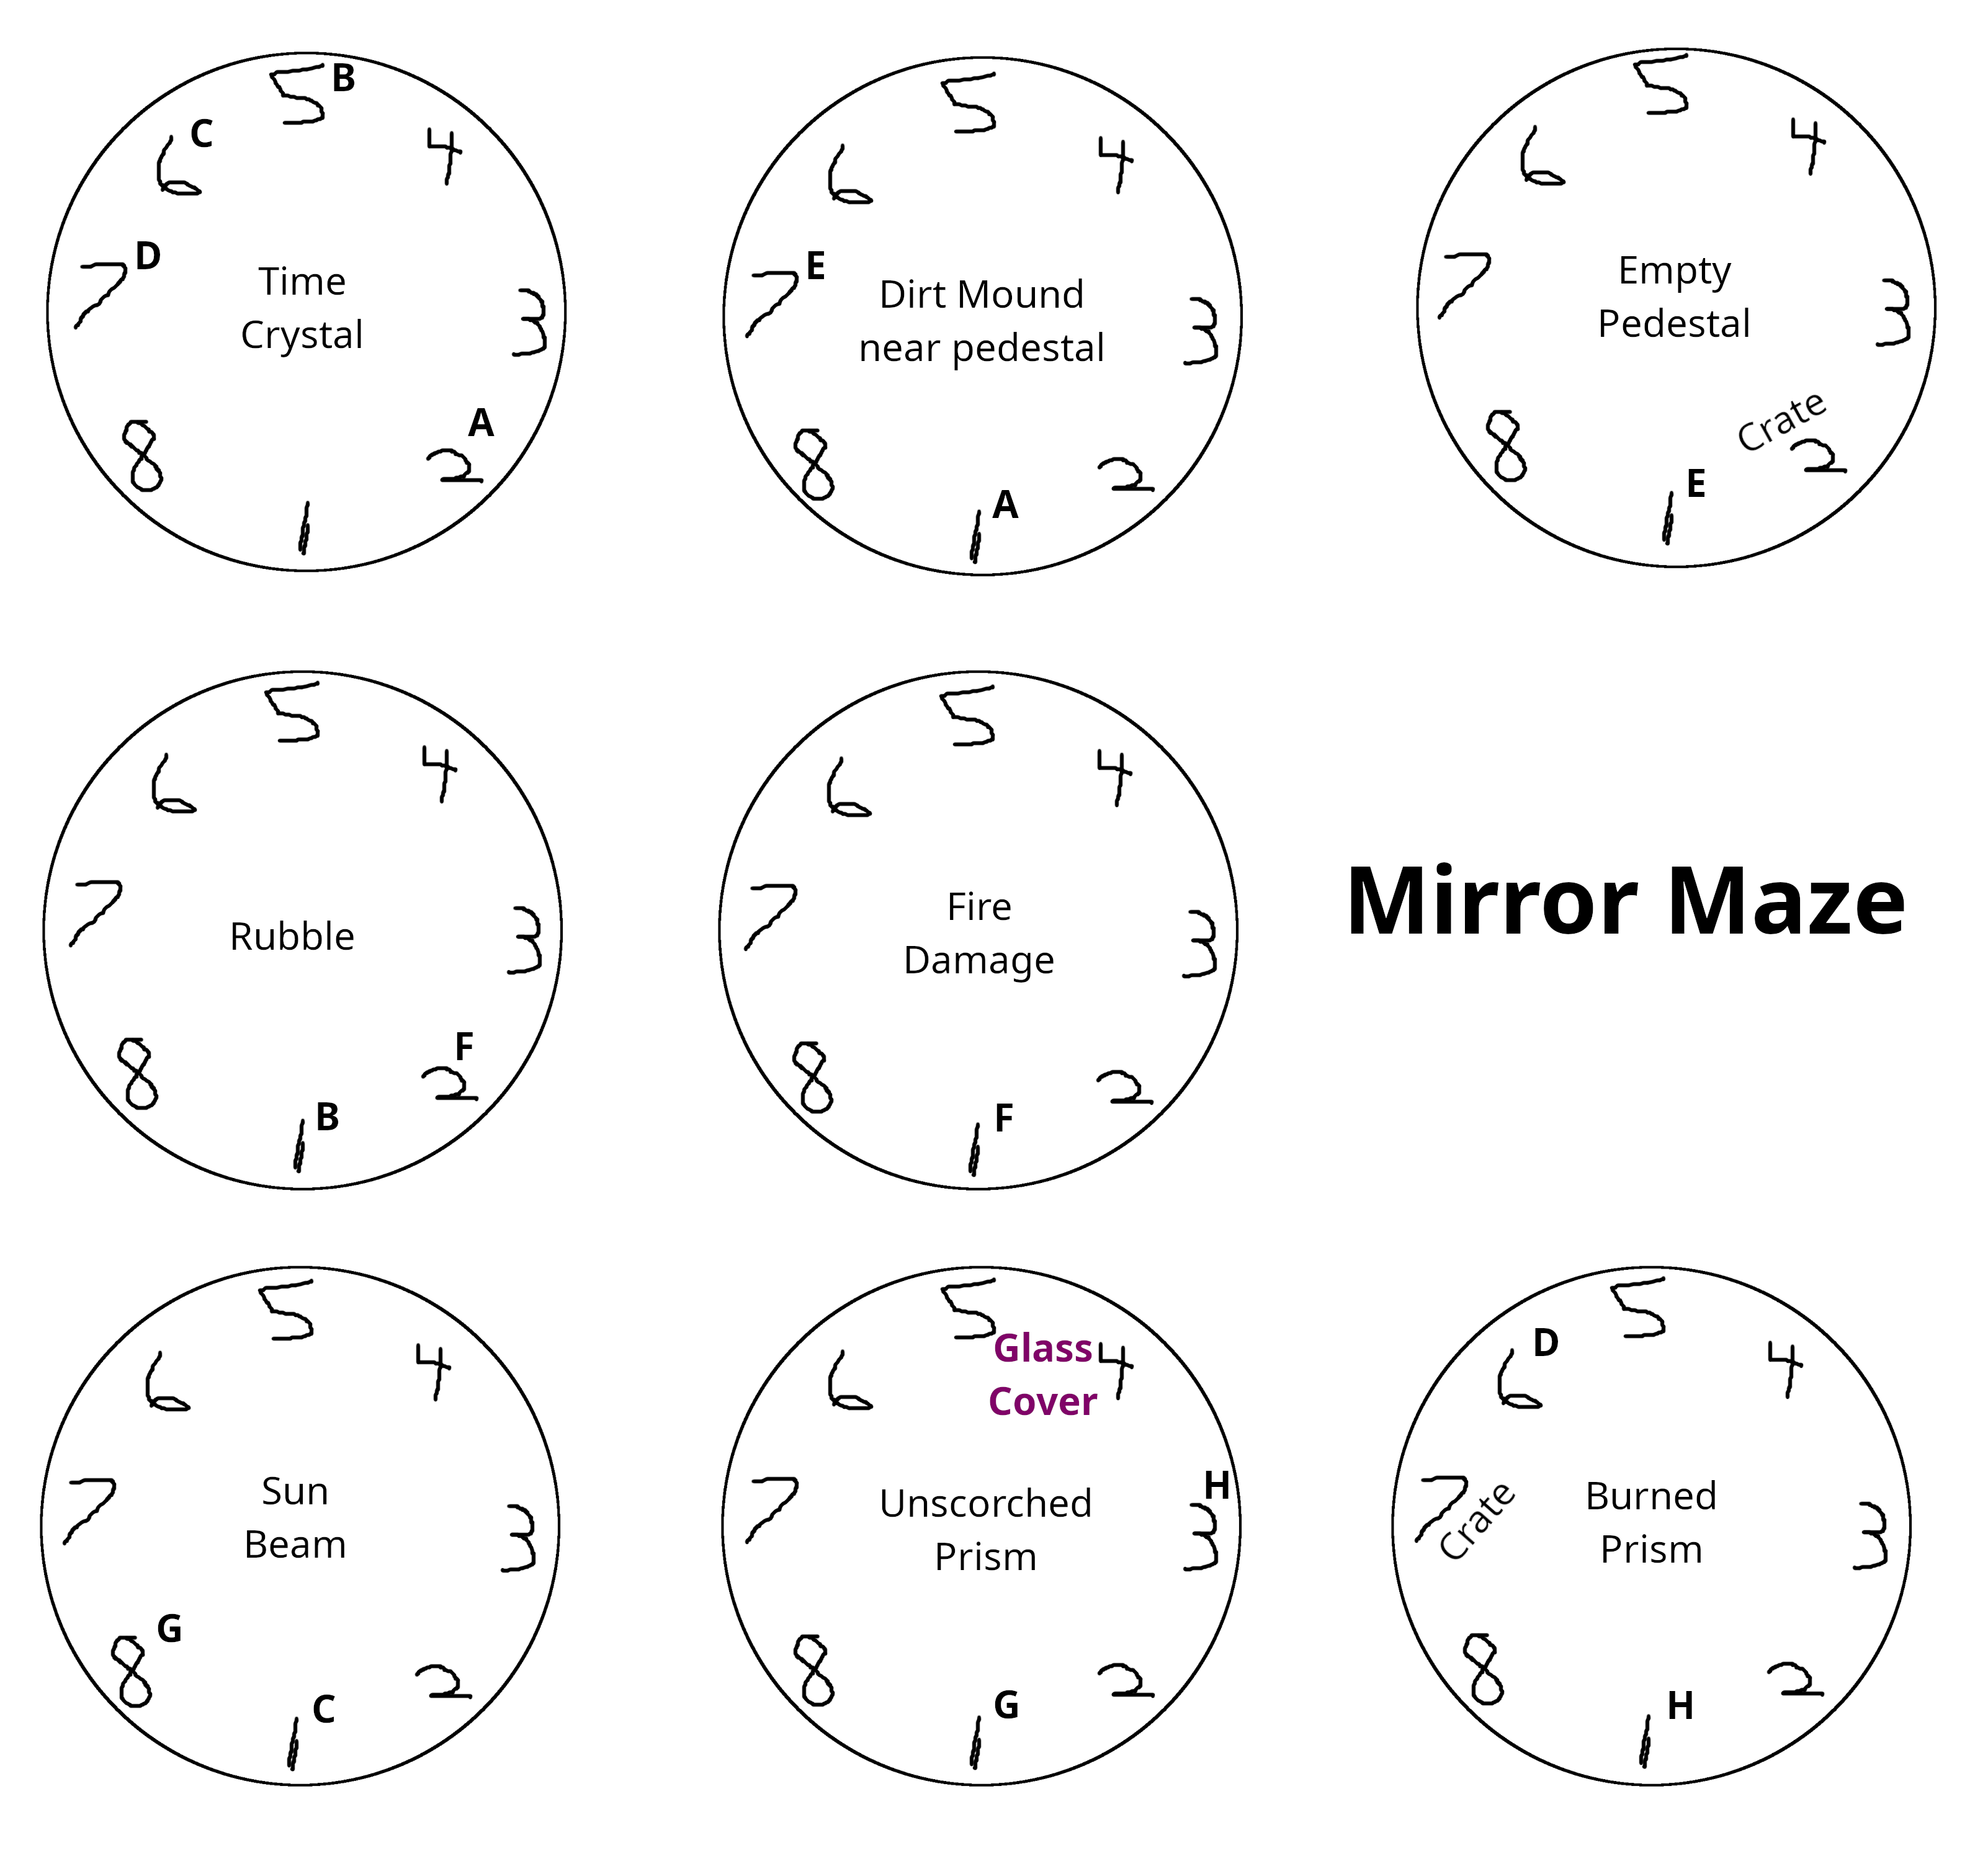
There's a time crystal sitting prominently on a short stone pedestal in the center of the room. This does not work in quite the same way as a time crystal normally would, as it does not alter the time period of the room directly. Rather, it activates certain mirrors in the room, and walking through those mirrors will transport you to various periods of time in the past and future. Sitting beneath the time crystal is a time prism. The prism, upon inspection, is revealed to be heavily damaged. The sequence of events you can glimpse while hopping through time periods is that the prism gets badly burned and cracked from a large fire that engulfed the room, and then a rock fell from a collapsing ceiling and broke it further. The ultimate goal of this room is to prevent both of those tragic events from happening.
 Attached to the right is a crude map I made. The mirrors along the wall are numbered from 1-8. To make things as simple as possible, the location marked as "1" in each room is where you entered from. Probably not how the devs mapped it out, but it made it easier for me to keep track of where I was so hopefully it will for you as well. The letters denote which mirrors are connected. So, to start things off, use the Time Orb on the time crystal and activate the mirrors. As you can see, you can travel to the room labeled Rubble and into the Fire Damage room to see the results of the fire, but this is completely optional once you know that a fire happens. Here's how to save the prism:
- Step 1: in the Time Crystal room, move through Mirror 6 to travel to the room labeled Sun Beam.
- Step 2: Move through Mirror 8.
- Step 3: this room is labeled as "Unscorched Crystal" as it exists in a point in time just before the fire happens. Across the room are some crates and barrels. Among the supplies is a Glass Cover. Pick this up and place it over the prism to protect it from the upcoming blaze.
- Step 4: Move through Mirror 3 to the Burned Prism room.
- Step 5: This room is labeled as such because it exists in a time shortly after the massive fire. The Glass Cover saved the prism from the flames, but was shattered in the process. Pick up the Prism from the stone pedestal. Move over to the crate in the room and place the Prism on top of it. Note: this is harder to do than you'd think. The mirror behind the crate is normally inert, so there's no hotspot over it indicating travel. Once you pick up the Prism, however, suddenly you're able to click on the mirror. Which means trying to place the Prism on the crate ends up being a frustrating sequence of Raven continuously telling you she can't take the prism out of the room. Best way I've found to overcome this is to approach the crate from the side. If you're tight enough against the wall, then the mirror is far enough off screen to be able to accurately select the crate.
- Step 6: once you finally get the Prism on the crate, exit through Mirror 6 to return to the Time Crystal room.
- Step 7: In the room aptly labeled as "Dirt Mound near pedestal," exit through Mirror 7 to go to the Empty Pedestal room.
- Step 8: There's a single rock on the pedestal which would have cracked the prism had we not moved it to the crate. Speaking of which, it's still there! Move the Prism from the crate to the pedestal.
- Step 9: return to the Time Crystal room.
Now that the prism is unharmed, a doorway has appeared where Mirror 4 had boon. There's absolutely no fanfare, you just have to notice that there's a new door. If you're turned around, it's the tunnel with the faint pink glow. Go ahead and enter that tunnel.
Lower Tunnels B
Follow this tunnel and you'll run into the Giant Bat!
General Strategy: He'll summon a group of small bats which shield him from all damage. The goal is to dispatch them so you can hurt the main bat. If you are unable to take out the initial four Small Bats in enough time, four additional ones will be summoned. If you take them out fast enough, the game thinks they're still there even though you can attack the Giant Bat. The dead bats keep attacking, but since they're dead they do not damage you...not sure if the fight in general is bugged, or if it just displays the wrong text.
How to Defeat:
- Round 1: Four smaller bats will be summoned. Use this free round to cast Demon's Pact.
- Round 2: The small bats will attack. Go ahead and cast Firestorm to take out the lackeys. Since we bolstered our magic the previous round, the spell will do enough damage to kill all the smaller bats. Without a demon's aid, it would take multiple rounds to kill them.
- Round 3 and onward: Just attack with whatever spell you want, should go down in two rounds. As mentioned previously, the only attacks that will come your way are from bats that don't exist, so you won't take any damage from here on.
After the battle, continue along the tunnel until you reach the Lava Cavern.
Lava Cavern
Turn left to follow the cliff edge to another wheel crank device. As with the one in the Elemental tower, the gears need to be connected. Use the Chains on them to ready this device for use. Turn the wheel to lower the nearby drawbridge. Well, mostly...looks like it's stuck on something. Make your way back to the Armor Room.
Armor Room
Head through the place where you melted the ice and you'll come across a large door. This will open for you if you're wearing the Moon Pendant. Sometimes the game will automatically equip you with the Cloak after a battle, so if the door is not opening take a quick look and make sure you're wearing the pendant. Once through the door, follow the tunnel down, around, and back up to emerge into a different area of the Lava Cavern.
Lava Cavern
You're on a long outcropping that overlooks the vast cavern. At the end, you can see that the drawbridge is held up by a stalactite. Did you know that on average a stalactite will grow somewhere between 0.13 to 3 millimeters, depending on water flow? That's just a fun science fact about how old that drawbridge is. At any rate, run forward and blow up the stalactite with a Fireball. Make your way back down to the foot of the drawbridge.
Once back on the lower level, use the wheel crank again to fully lower the bridge. Walk across it and follow the tunnel to the next large cavernous area.
Ancient Throne
Not too far into this room you'll begin an encounter with the Flesh Dragon!
General Strategy: You can't seem to hit him with anything, since he can see the future, so you'll have to get creative.
How to Defeat:
- Round 1: The dragon will attack you. Respond by casting Revealing Rays to get in on the prescience action, with an added bonus of dealing 120HP.
- Round 2: The dragon will be incensed that you're horning in on his prophetic strategies, and begin to ready an Ultimate Attack. Better protect ourselves by casting Blinding Light.
- Round 3 and onward: The Ultimate Attack will miss. Just repeat the first two rounds until he runs out of health.
After defeating the prognostic persecutor of pain, move forward and head around the throne to reach a large set of doors. Open them and head on through to exit the Caves.
Congratulations on completing Level 5!
