Tower of Trials
Waterway
Move forward and down the small set of stairs and open the door straight ahead to enter the tower.
Trials Tower B1

Read the plinth in front of you for a brief description of the tower's purpose, and then Lakmir will show up for another fun chat. Once he fades away, head forward but turn right when you reach the stairs and enter the door.
There's book you can pick up in this room if you wish. Once you grab the Novice's Chart, head through the other door.
A few more books in this room, some of which are mildly useful in helping get through the tower. You can pick up The Brotherhood Report, The Writings of Konnor, and The Trials of the Kingdom. Once you have however much reading material you wish and head trough the other door in the back of the room.
This office room looks to be empty. But if you approach the desk while wearing The Ring of the Dead, then the ghost of Nathor Dreslin will appear. He'll lament his death and let it spill that he rigged the trials. Good to know. Head back out into the entrance room and go up the stairs.
Trials Tower 1F
Read the plinth to find out that you must "Pay homage to the king!" There are six large paintings in here, and you can examine each to see who they depict. You may know from your history readings that Jair would have been considered king when these trials were created. But examining his painting will lead to an empty room. If you end up here, just exit back into the painting room. Nathor's ghost told us about how he rigged the trials, so find the painting of him. Once you discover it you need only pay homage to it. Kneel down, and look down at the bottom of the frame. Examine the frame to spot a hidden switch that opens the hidden door that Del will automatically move through.
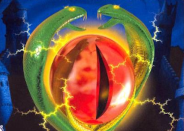
The plinth in this room instructs you to "Create the true coat of arms." Spin around and approach the stone table and pick up the object sitting on it to get the Fragments of a Crest. Turn around again and approach the opposite wall. Examine the blank coat of arms and we'll zoom in and be prompted to reassemble it. You'll be asked to pick between a series of two puzzle pieces to create the royal coat of arms. The actual coat of arms was the one emblazoned on the wall in the Control Room behind the valves. However, this was another puzzle disrupted by Nathor, so we'll have to assemble the Dreslin crest. You can find this in the The House of Dreslin book found in the Disciples Tower 4F. Or in the picture below this. Whichever. For the text walkthrough:
- Select the turret with the single window
- Select the dragon with the open mouth facing to the right
- Select the dragon with the open mouth facing to the left
- Select the set of tails on the left
Once completed properly, a hidden door will open and Del will move through.
Turn left and approach the giant stone face. It will initiate a quiz. When you get an answer correct, the face will lower into the floor and you'll need to approach the next one to answer another question. Once you get five questions in a row correct, you will be granted access to the next floor. All of the answers can be found in the various books and notes that you've been studiously picking up. Here are the possible questions you will be asked:
- For what symbol is one given a sorcerous rank?
- The Ring of the Kingdom
- The Ring of the Circle
- What is Lord Jair's homeland?
- Kal Torlin
- Westland
- By what name does the master of Dersius go?
- Rastolin
- Aristolin
- What was responsible for the banishment of the Evil One?
- The Staff of Ages
- The Staff of Thunder
- What is the prohibition against black magic?
- Overpowers the mind
- It taints the soul
- Does the royal family's dragon scream?
- Yes
- No
- What type of magic is expressly forbidden?
- Death magic
- Chaos magic
- Name the number of ways into the Royal Family's tomb?
- Two
- Three
- What ring is used as a punishment for those who disobey?
- Green Ring
- Blue Ring
- What was the name of the first dragon?
- Bolhalor
- Rolsalor
- What species was the last dragon?
- Gold
- Red
- Who is the rightful king of Kal Torlin?
- Lord Jair
- Nathor Dreslin
After passing the quiz, approach the knight bust to be teleported to the next floor.
Trials Tower 2F

As soon as you move, you'll notice that your controls are reversed. This makes the room very challenging, but luckily we have a way to circumvent it. Simply put on The Blue Ring to reverse your reversed controls to give you normal controls. This room is fairly straight forward: just make your way around the spinning spikes to the various knight busts. Keep going until you get to a door. Move through the door and remove the Blue Ring. Be careful not to touch any of the suits of armor in here, as they will teleport you back to the entrance of the tower. Reading the plaque on the wall reveals that you need to carry a lit candle through the next room.
Approach the candle and use the Flint on it to light the wick. Pick up the Burning Candle move through the double doors between the suits of armor into a maze area. The goal is to make your way through the next series of rooms before the candle goes out. I'll do my best here, but will also include a video for reference.
- Room 1: Pretty simple. Just follow the hallway until you find some stairs to ascend.
- Room 2: Follow the hallway around a couple corners until you see a big red button on the wall. Press the button, and you'll hear some mechanisms activate. These buttons are scattered throughout the maze, and are used to reveal (or conceal) hidden doors. Turn back around and move around the corner. You'll see that a section of the wall has moved, but ignore that for now and make your way back to the staircase. When you reach the stairs, turn left to find another newly revealed section of the hallway. Press the red button at the end of this section, then make your way to the other new hall section. Enter it this time and make your way along it to a door and head through. Walk down the short hall and climb up the ladder.
- Room 3: At the top, turn right to follow the hallway a bit. There will be two recesses on the left: one with a button and one with a teleporting knight bust. Press the button, then continue down the hall past the knight recess to reach another ladder. Climb down.
- Room 4: There are two doors in here. The one of the left will lead to an infinite series of doors, which will certainly not be good for our melting candle. Enter the door on the right, and then through the next door. Turn right and press the red button you should see a bit ahead along the left wall. Go back to the doors and take the one on the right (the left one again will be an infinite corridor), through the next door, and then back up the ladder.
- Room 3: Enter the second recess on the right and press the red button again. This will seal off the entrance to Room 4, and unseal the entrance to Room 2. Turn right out of the recess and back down the ladder that leads to Room 2.
- Room 2: At the bottom of the ladder, you'll see the door to the rest of Room 2 straight ahead. Walk towards it, but turn right when you reach a side hall that was closed off before (this opens once you press the button in Room 4). At the end of this hall, press another red button. Now head back up to Room 3.
- Room 3: Press the button in the recess again and head down to Room 4.
- Room 4: Take the door on the right again, and the next door, and head toward the button again. When you reach it, turn right and head down the hall. Move up the stairs to reach the exit to this maze.
Quickly move forward and place the Burning Candle on the candle holder to complete the puzzle and unlock the door in this room. If the candle goes out before you reach the holder, use the knight busts to teleport back and try this again. Head through the door.
Trials Tower 4F

Examine the plinth in this room to learn that sometimes the true path is behind you. Examine any of the three mirrors in this room and a reflection of Del will appear and lay out the goal of this puzzle. You will need to examine each of the mirrors and listen to what the reflections say to you. Two of them are reflections of what is in Del's heart, and one is not. You can chat with all of them, but the solution is the mirror on the right. Remember that Del's first reflection said to turn away from the false image. Approach the mirror in the right, then turn around so you're facing away from it. Back up until you pass through the mirror into the next room.
Walk to the pedestal and pick up the Ring of the Kingdom from the cover. Put on the ring step on the white square on the other side of the pedestal. Thus completes the Tower of Trials.